Voicemeeter, a hidden gem [for Windows only]
As I have mentioned in What I use for streaming, the Voicemeeter free-to-use software deserves its own post, so here it is.
What is Voicemeeter? It’s “an Audio Mixer Application endowed with Virtual Audio Device used as Virtual I/O to mix and manage any audio sources from or to any audio devices or applications”, as it says on the official website.
Why is it a gem in my opinion? For those who have different audio hardware might have had a hard time trying to get the settings right in some applications. Let’s say you have a pair of headphones, a pair of speakers and a microphone. Your operating system will by default choose one of these as the default device for output/input. When you go into an application, like a videogame, you might want to choose a different output. There might be different ways of doing it, through the game settings or from the operating system’s audio tray. Some games set the system’s default device, some do not. Same goes for any kind of multimedia software. I know, it doesn’t sound like anything annoying or complicated, but what if you have more than one microphone or even more output devices? This is what Voicemeeter is good for and it’s only the tip of the iceberg.
VoiceMeeter versions
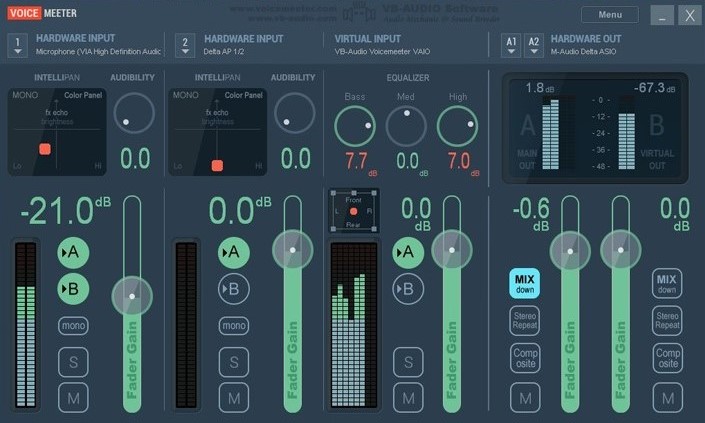
Voicemeeter has different versions: Basic, Banana, Potato (the most advanced). What changes between the versions is the amount of outputs/inputs you can manage. I use the Banana version, but for the sake of simplicity I will show you the basic layout. Once you know how it works, I suggest you to go with the Banana version, as it offers more options.
First thing to do
Once you have installed VoiceMeeter, go to your system’s audio settings and you will see new “devices” like “VoiceMeeter VAIO Input” for the playback and “VoiceMeeter VAIO Output” for the recording. Set these as your default devices.
Letters A
Now let’s explain immediately what the letters A are. They are your hardware outputs, like headphones or speakers. You can assign a hardware device by clicking on the desired letter A under the “Menu” button in the “HARDWARE OUT” section. Just click on the letter and select your device (with the WDM driver).
Letter B
The letter B is what you see as “VoiceMeeter VAIO Output” in your system’s audio recording devices. This is what the system now considers as your main microphone.
Virtual input
While the letter B is seen by the system as your recording device. This Virtual input section is what your system sees as “VoiceMeeter VAIO Input” in your playback device. That means that the sound produced by your system will go into this input. So if you click on the letter A in this section, the sound coming from your system will end up in the hardware that you have assigned to the letter A, that is your headphones or speakers. You might ask then, what if we click on the letter B? Well, it means that your audio system will also go into the “VoiceMeeter VAIO Output”. That means that if you call someone and you are listening to some music that person will hear your music and any other sound of the system.
Hardware inputs
As you can see, there are two columns dedicated to hardware inputs. This is where you can select your microphones. To assign a microphone to a hardware input column, just click on the line under “HARDWARE INPUT” and you will see a list with all your microphones. Select one with with the WDM driver. As you can see, there are letters A and B as well. So what happens if you click on the letter B? The sound incoming into your microphone will be forwarded to “VoiceMeeter VAIO Output”. So if you want to call someone on Discord and you want them to hear you, you have to click on the letter B. What happens if you click on the letter A then? That’s right, you will hear yourself from your headphones or speakers, so it’s great for monitoring.
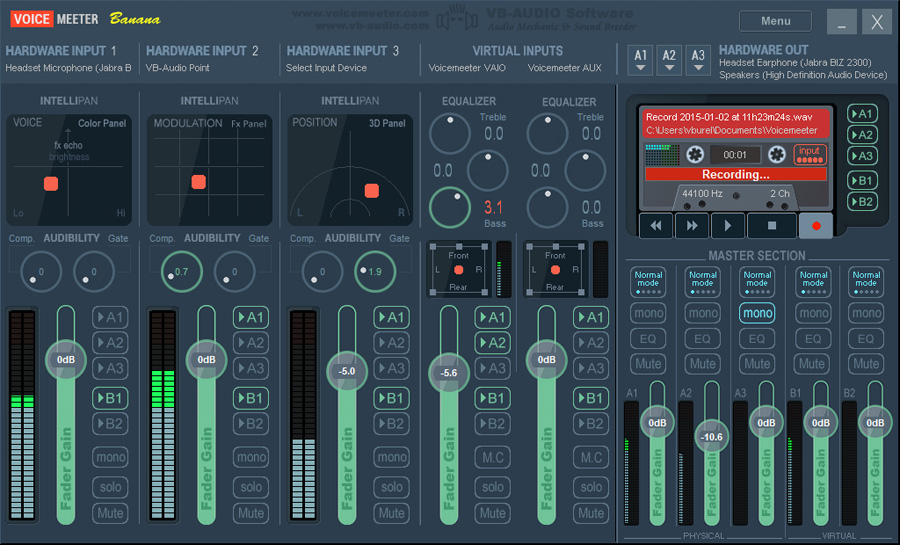
Why you should go with VoiceMeeter Banana
I know I haven’t covered every single button of the basic interface, but I just wanted to unveil the potential of the software. Imagine having more virtual inputs. That means, for example, that you could have a dedicated virtual input for Discord, which is great for audio management in streaming. And what if you had more letters B? In that case you would be able to route your secondary microphone input to a different output. All this is possible in the Banana version, which looks like this:
Final thoughts
I know that all this might seem confusing at first, to me it was, but I can guarantee you that once you try it you will never go back. There is so much more that can be done with this software. You can even use VST plugins with it, but I didn’t want this post to be too long and boring.
If you will use it and end up appreciating it like I do, please consider donating to the creators.